Video Integration Part 2
Below are the videos from Video Integration Part 1. However, they have now been placed in a format that students can use to teach themselves how to play basic piano skills and the basic blues progression. A lesson/Asset plan is embedded below to guide professionals on how to implement these assets in their classroom.
Piano Basics

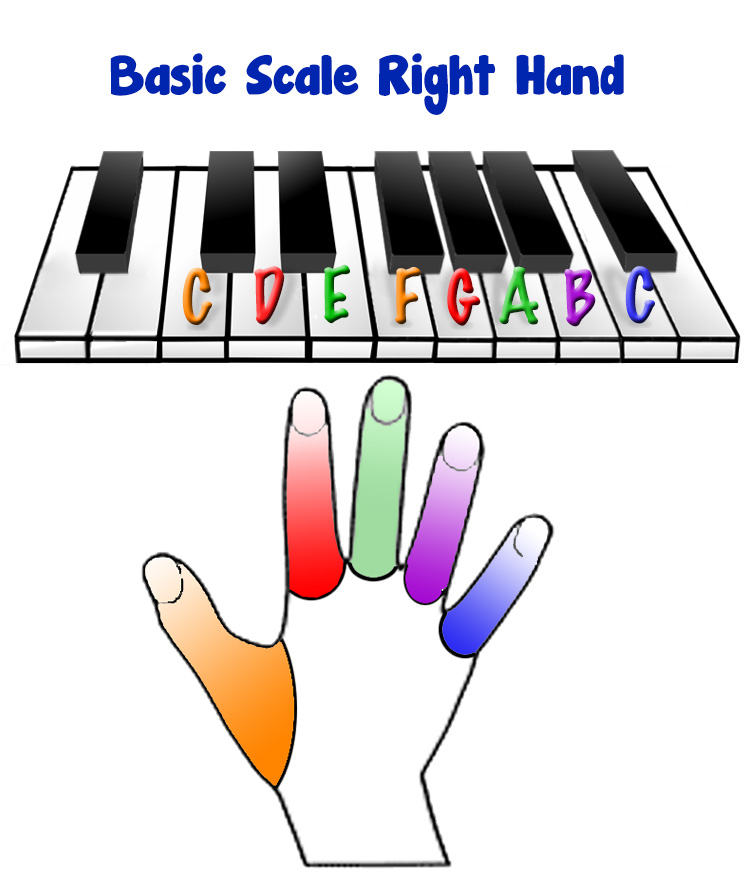
Welcome to the piano, lets get started. Notice that the black notes are in groups of two and three. Remember that C comes just before the group of two black notes. In your right hand place your thumb on C. When using your left place your pinky finger on C. Every note after C gets one finger. This is called Five Finger or Home position.
Start in home position and follow along with the illustrations and videos provided so that you can complete the Piano Basics. When you would like to prove that you have mastered the basics, raise your hand and the teacher will listen to you play what is in the last video of this series. If you can accurately play what is in the video you will pass. If you can’t then you will be given help and asked to try again later after some more practice. Good luck!
-
Right hand Scale
Remember to start in 5 finger position starting on C with your thumb. If you do not know how to do that re-read the ‘Welcome’ message or ask for help. Do not move onto the left hand scale until you can accurately play what is in the video. Click on the picture for an enlarged view.
-
Right hand Scale
Remember to start in 5 finger position starting on C with your pinky. If you do not know how to do that re-read the ‘Welcome’ message or ask for help. Do not move onto the Hands Together Scale until you can accurately play what is in the video. Click on the picture for an enlarged view.
-
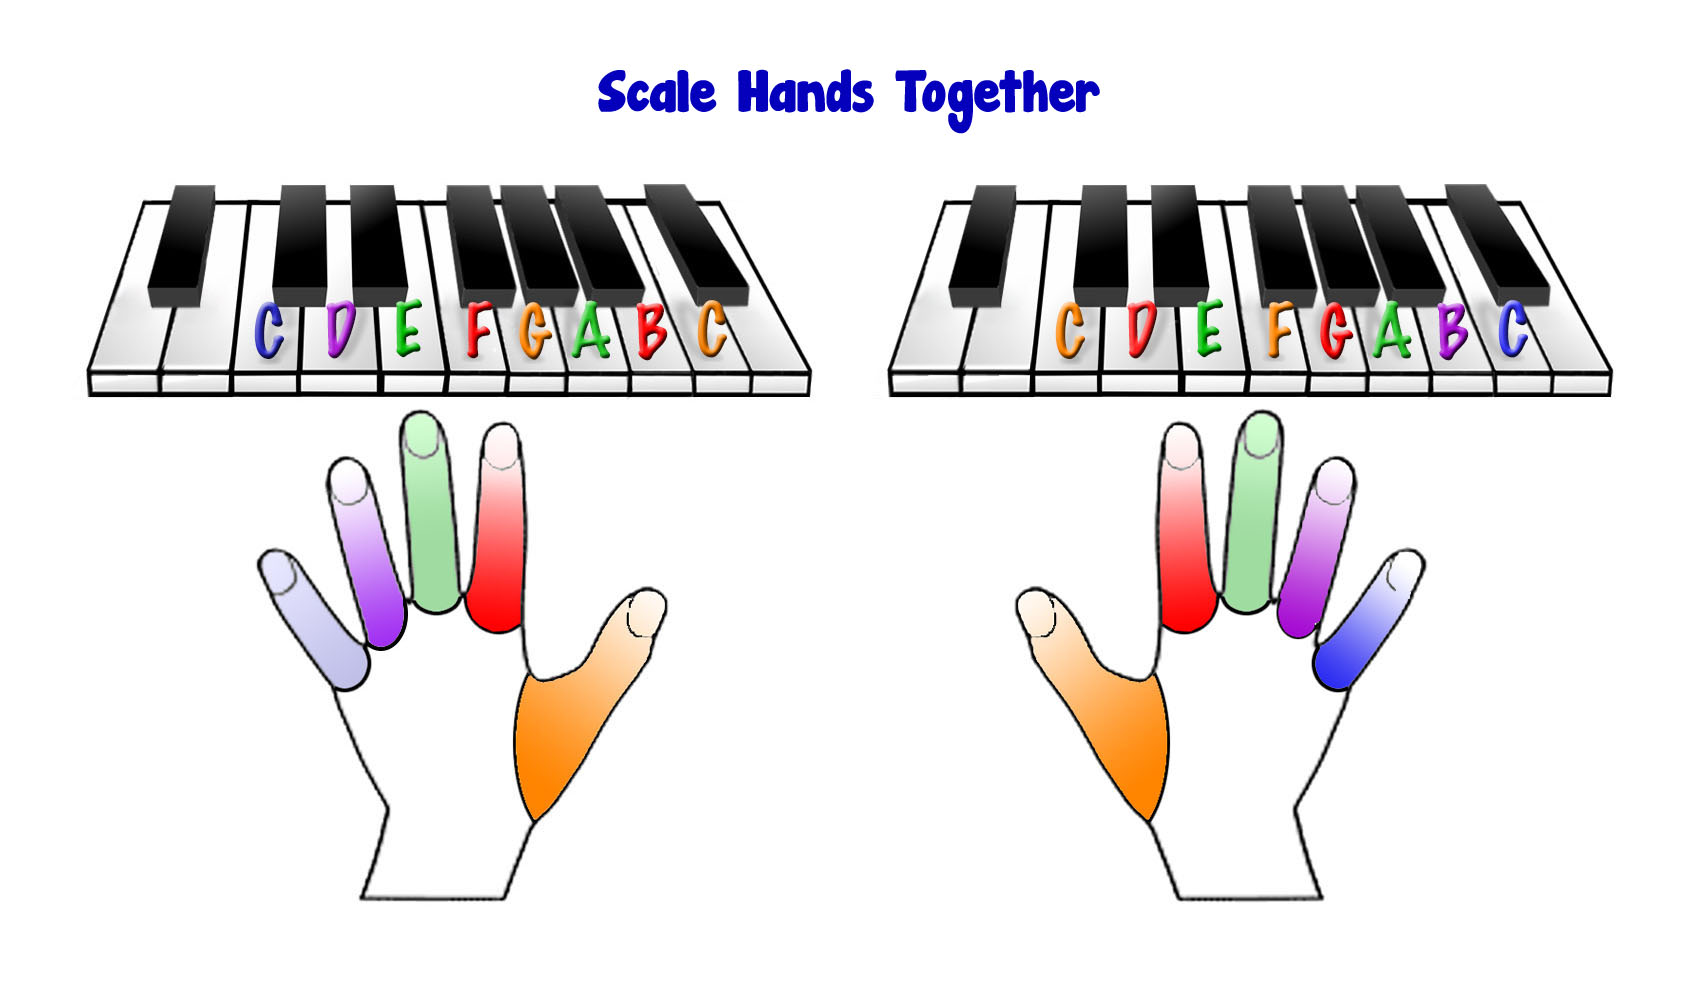
Scale Hands Together
Start in normal 5 finger position starting in both hands. Follow along with the video and illustrations to help remind you where your hands go. Ask for help if you need it. Do not move onto the Left Hand Chords until you can accurately play what is in the video. Click on the picture for an enlarged view.
-
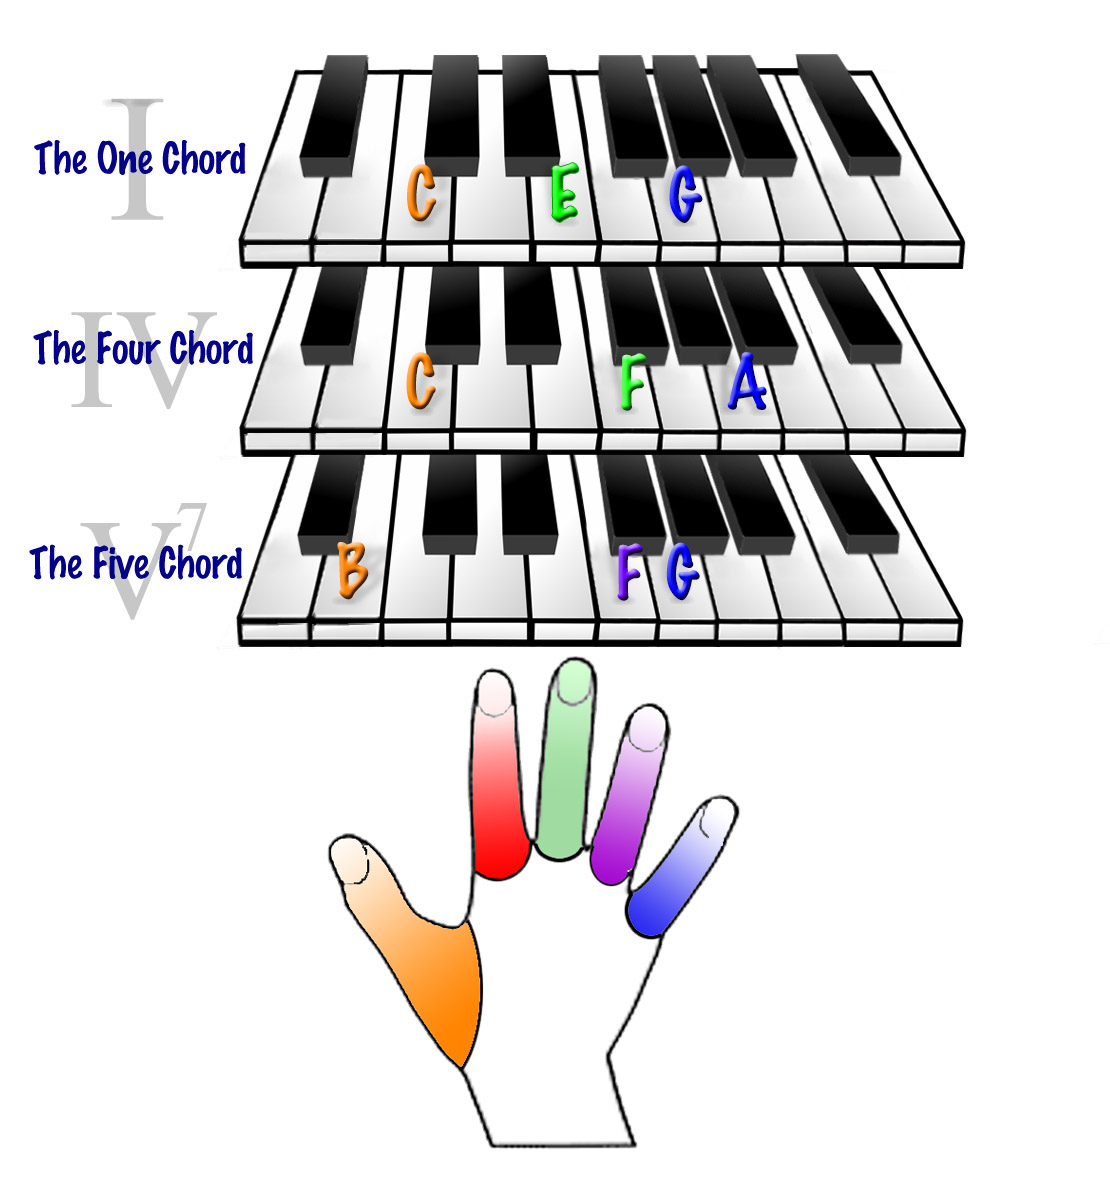
Right hand Chords
Start in normal 5 finger position starting on C with your thumb. Examine the illustration and follow the video to see where your hands go to play each of the three chords. Ask for help if you need it. Do not move onto the Left Hand Chords until you can accurately play what is in the video. Click on the picture for an enlarged view.
-
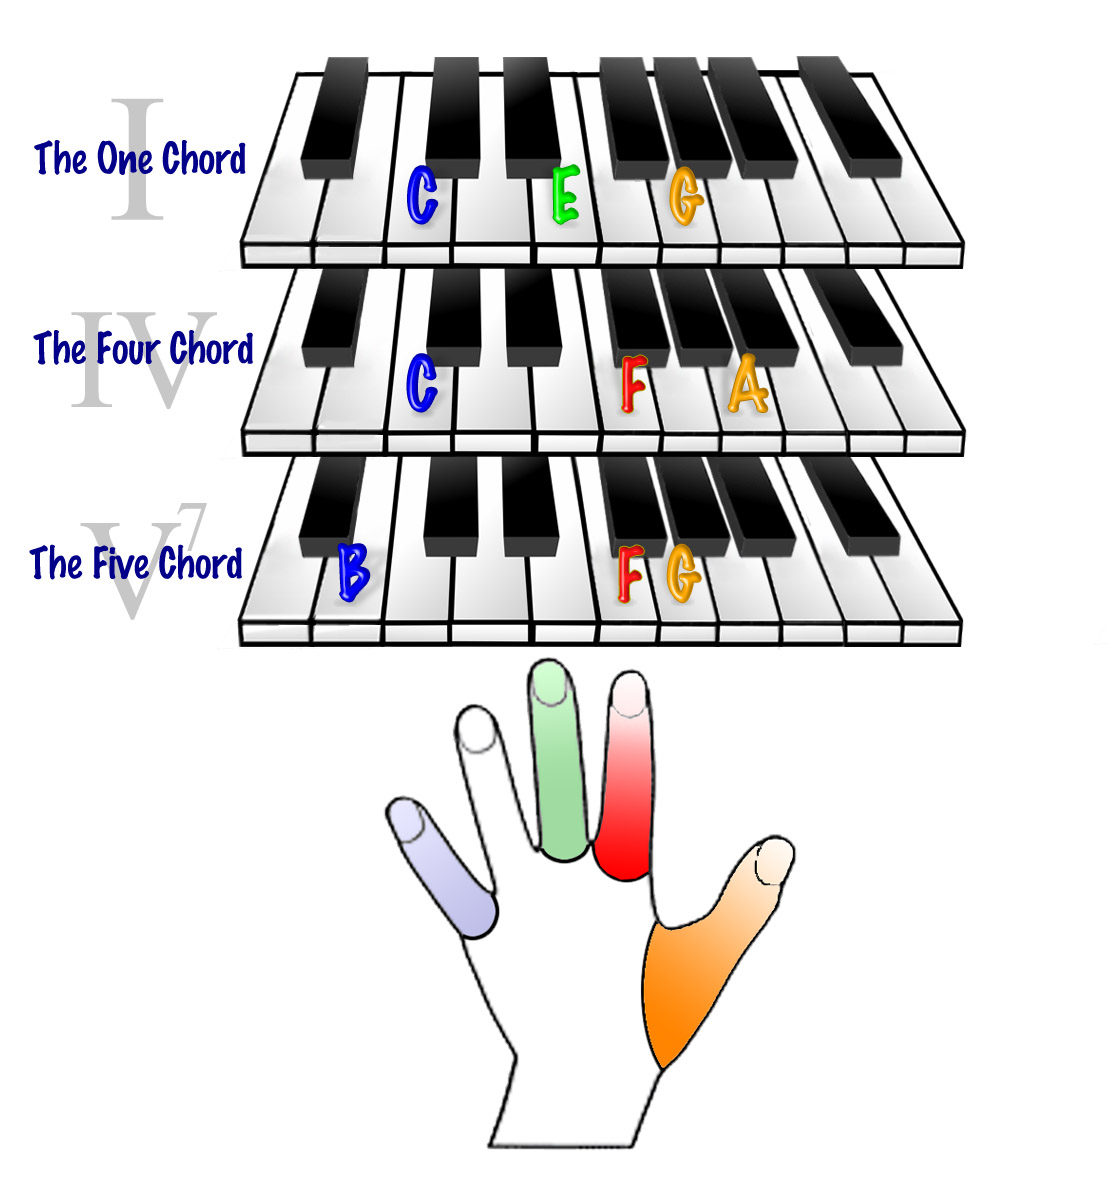
Left Hand Chords
Start in normal 5 finger position starting in both hands. Follow along with the video and illustrations to help remind you where your hands go. Ask for help if you need it. Do not move onto Chords Hands Together until you can accurately play what is in the video. Click on the picture for an enlarged view.
-
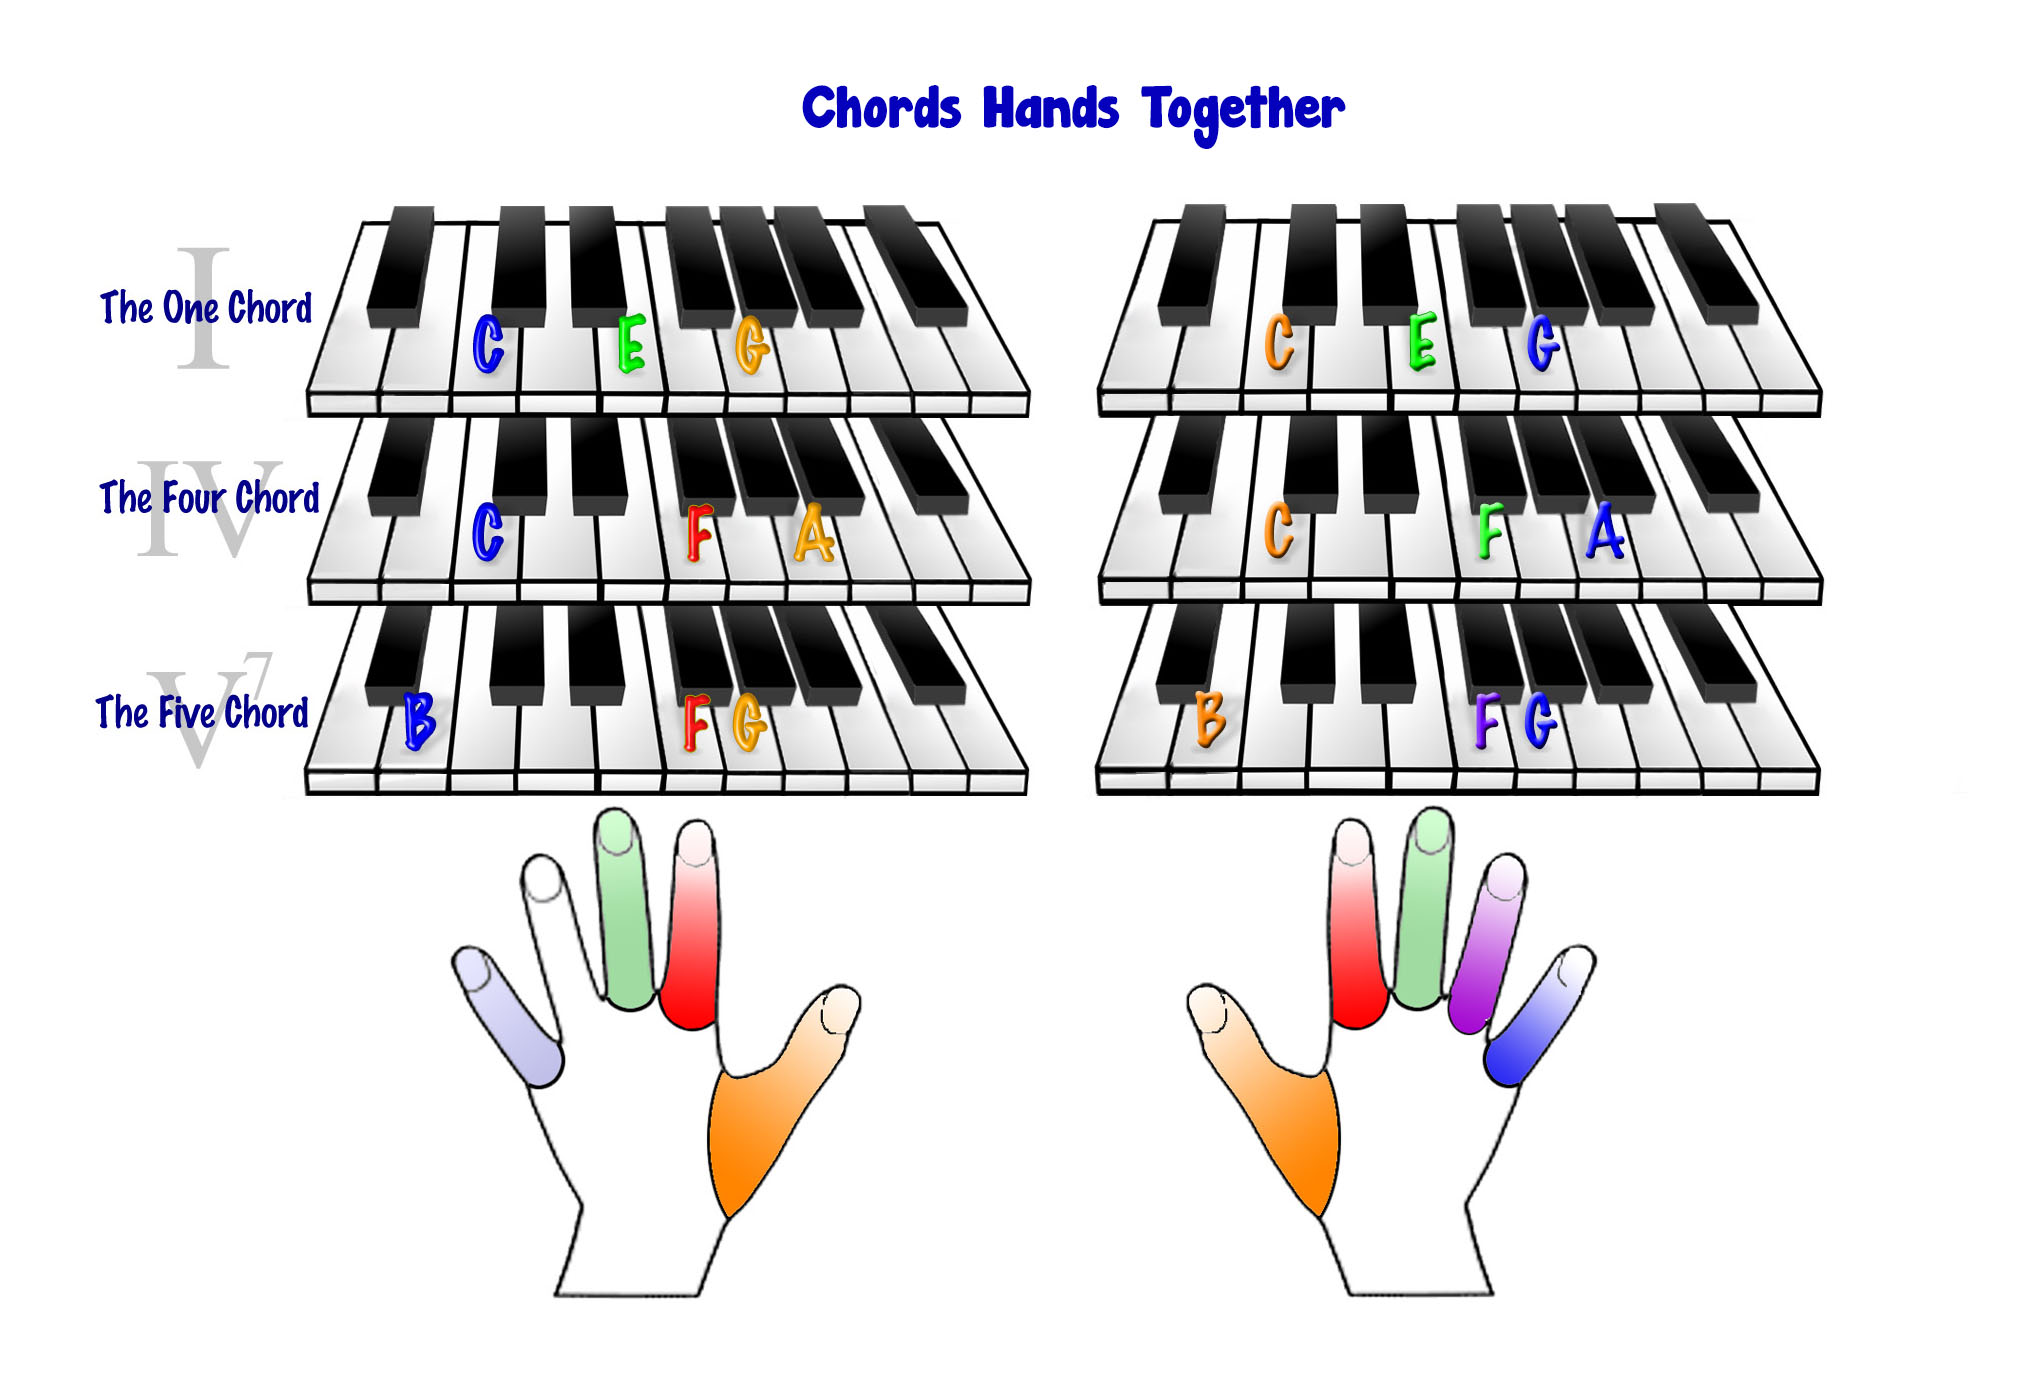
Chords Hands Together
Start in normal 5 finger position starting in both hands. Follow along with the video and illustrations to help remind you where your hands go. Ask for help if you need it. Do not move onto The Basics Final until you can accurately play what is in the video. Click on the picture for an enlarged view.
-
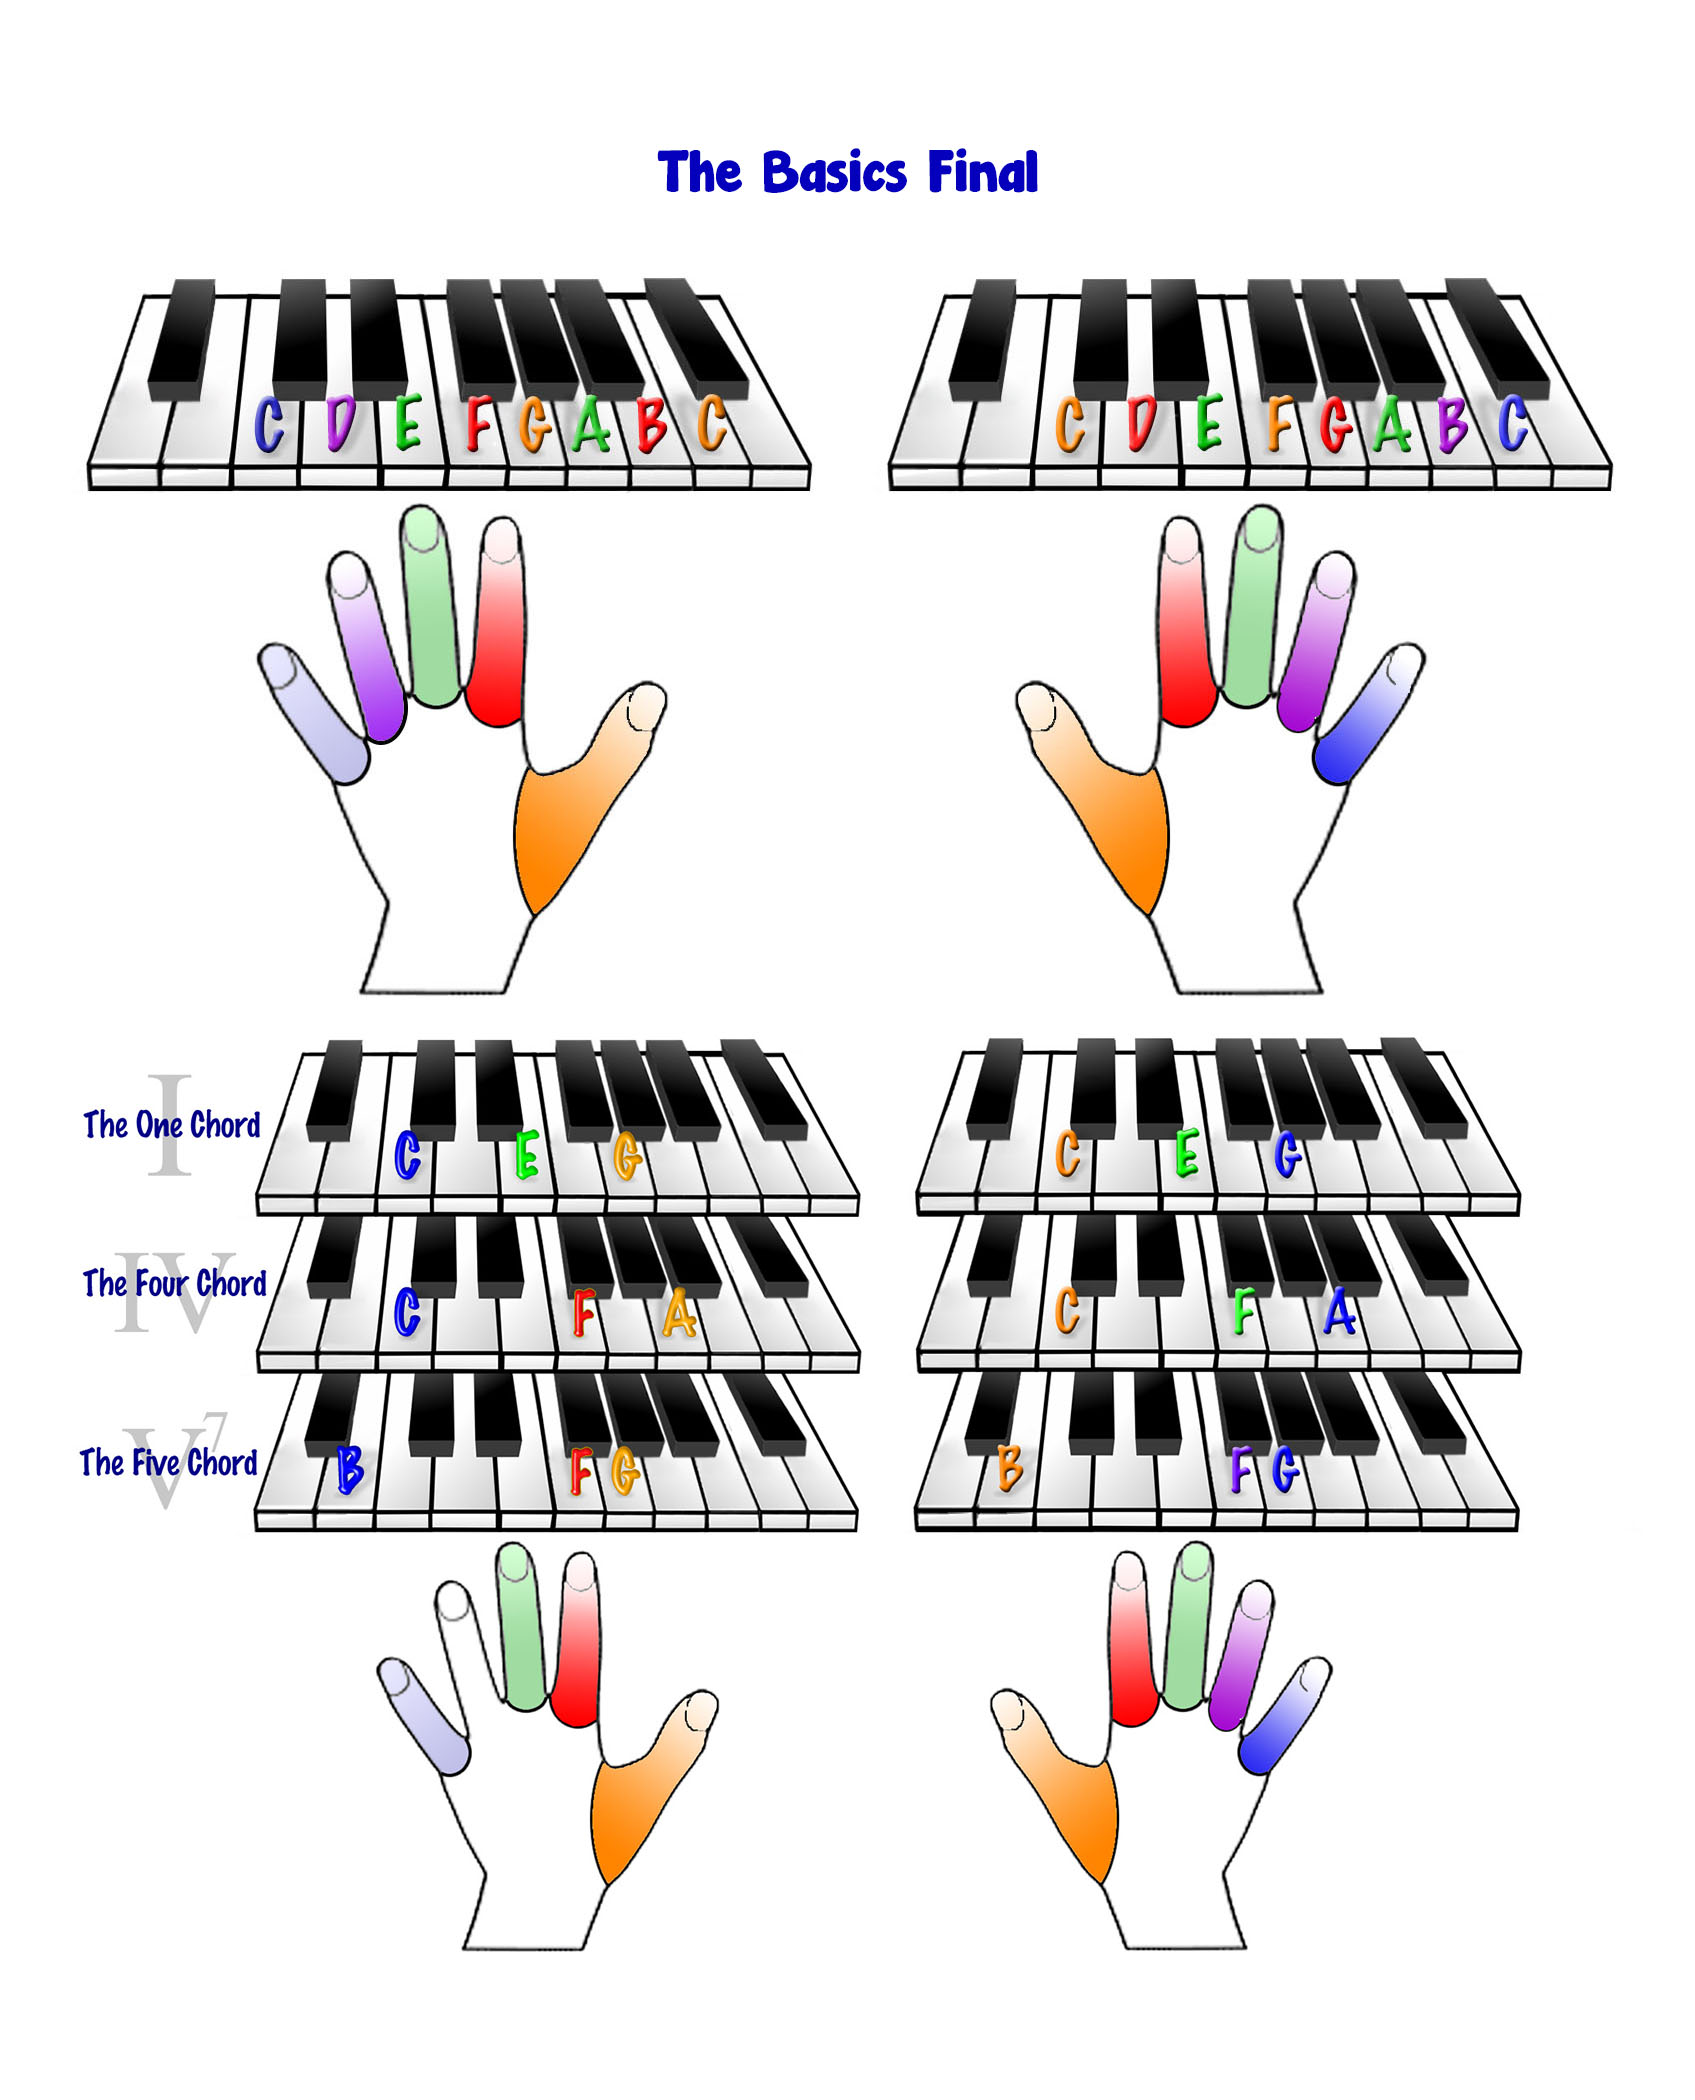
The Basics Final
Congratulations on making it to the end. Follow along with the Video and the illustration provided. Click on the picture for an enlarged view. When you think you are ready raise your hand. You will be judged on how closely you can do what is in the final video. If you pass that’s excellent. If not you will be given suggestions and you can try again when you are ready. If you cannot do what is in the final video figure out where your trouble is and review that section. Ask if you need help. Good Luck!

How to Play the Blues
-
The Blues is an elastic (or stretchable) form of music that is built around a specific scale and specific set of chords usually arranged in a twelve bar sequence. Part of playing the Blues is an expectation of improvisation and of expressing deep emotion. Expressing this emotion often comes in the form of singing about life and its many problems. The Blues can be about a mean boss, an unfaithful lover, or just about anything that makes life difficult. By playing and singing the blues the musician is hoping to connect with the listener’s own experiences and to help everyone get past the problem being expressed.
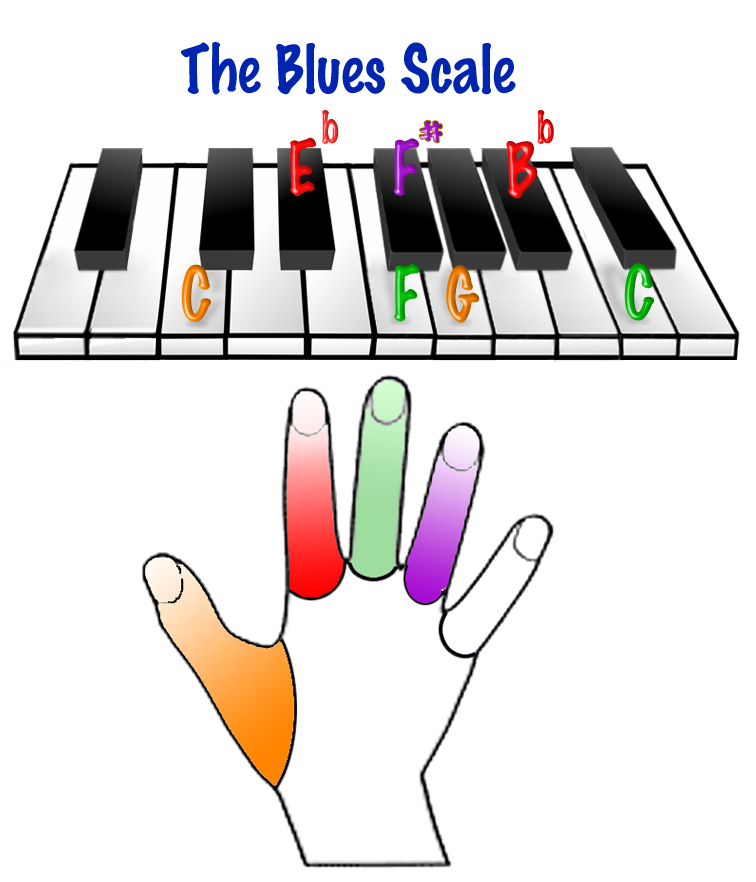
During the following lesson you begin by acquainting yourself with a version of the blues scale called the ‘Hexatonic Blues Scale’ (C-Eb-F-F#-G-Bb-C). Next you will learn about the left hand chords you will need to play (I-IV-V7). Next, you will put them together in a basic 12 bar sequence. Finally, you will need to get beyond just the mechanics of playing the blues and learn to improvise off the pattern you learned. Some of you will even add lyrics to your improvisation about life’s problems.
Go through the tabs in order to ensure that you understand all that is expected of you during this lesson. If you have questions don’t be afraid to ask and stay on task during class work time to ensure that you get enough practice in to reach your desired level of achievement.
-
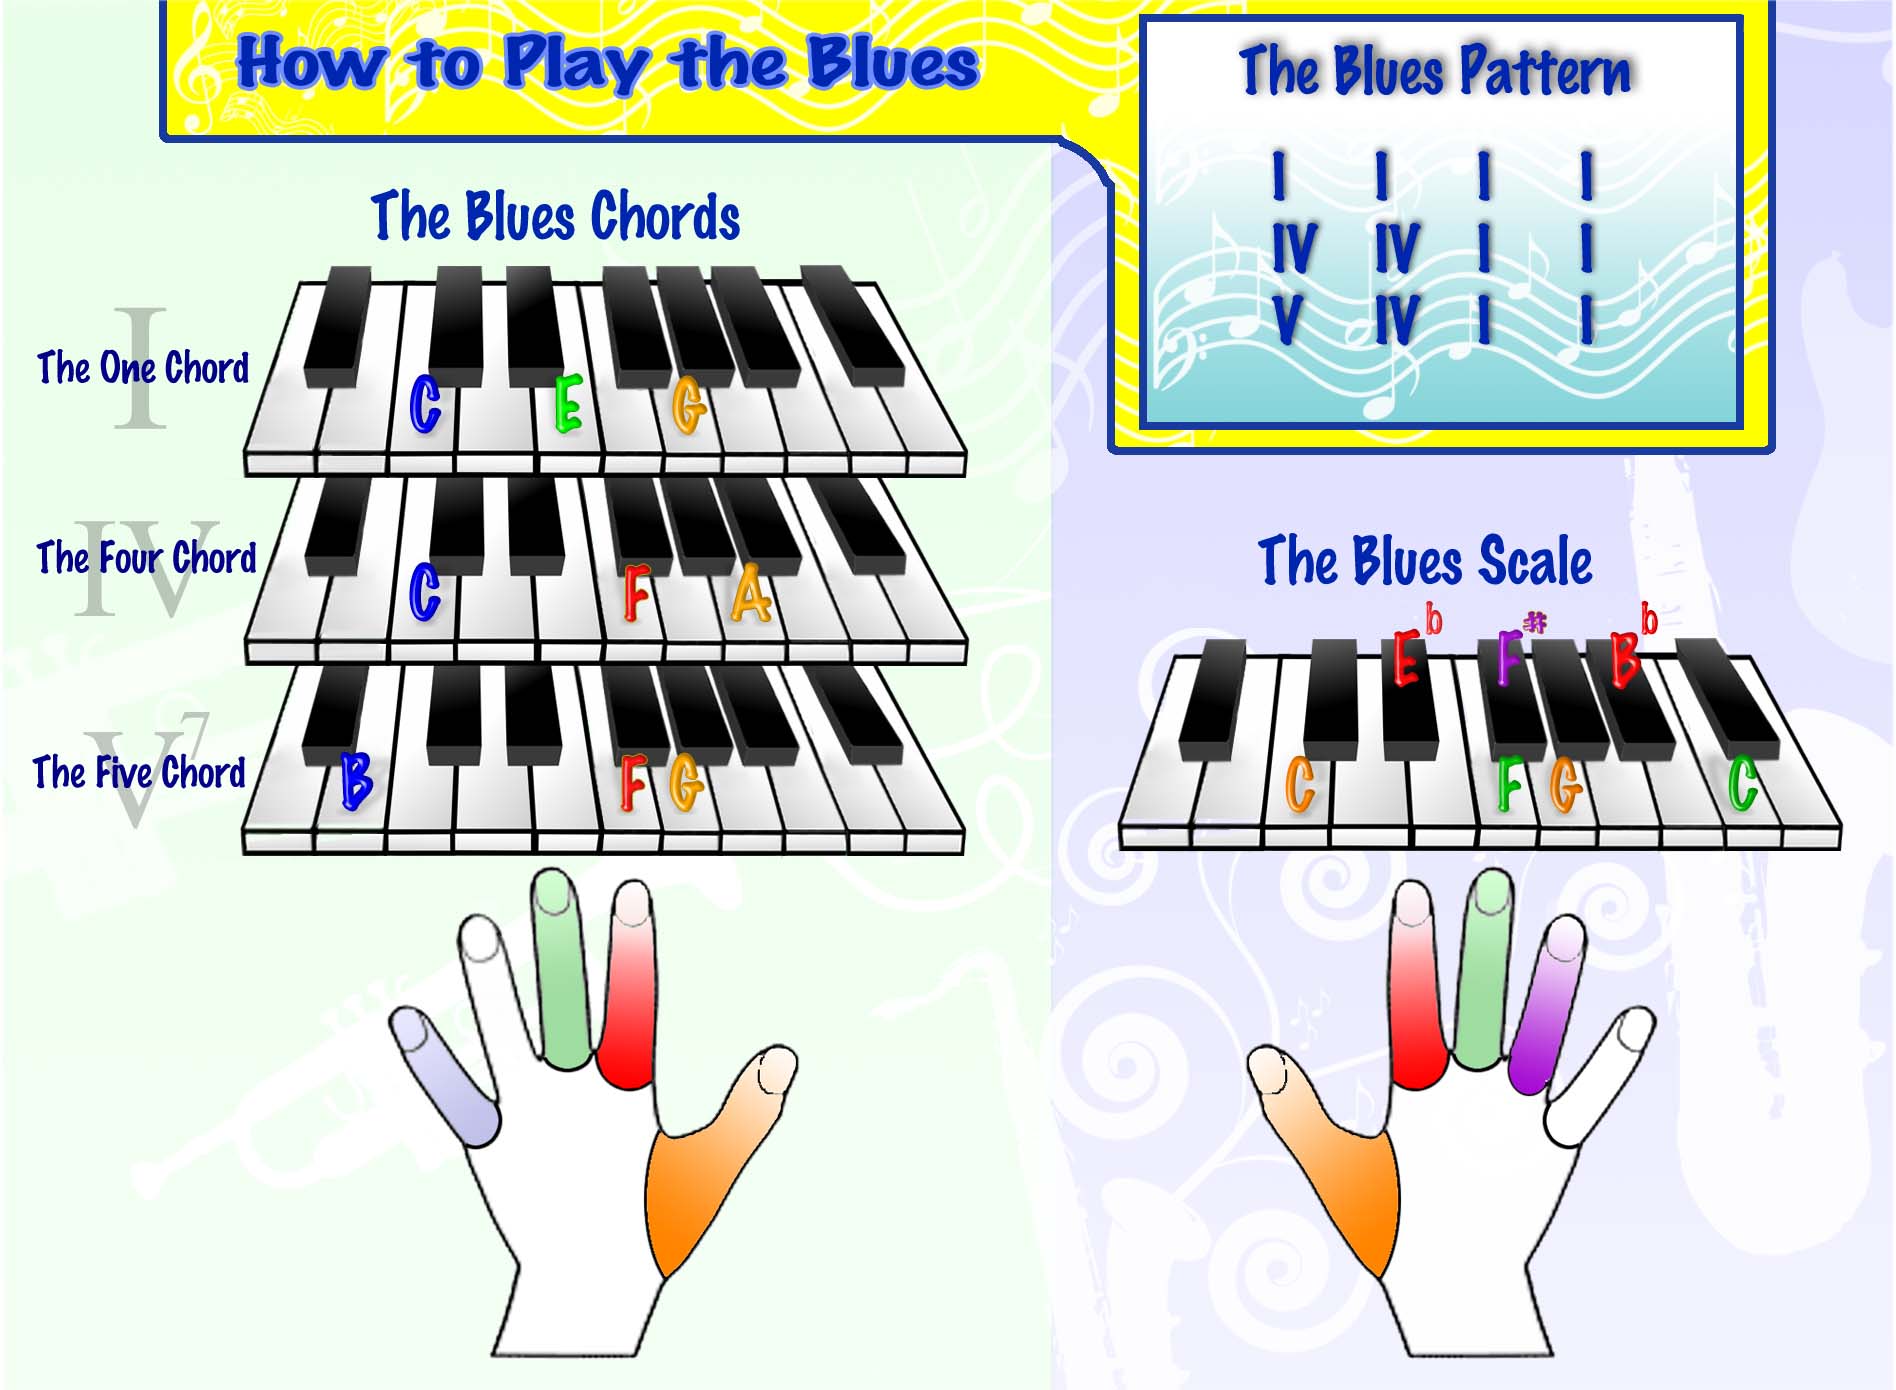
The Blues uses three different chords. These chords are known by the roman numerals (I-IV-V7) and are played with the left hand on the piano.
Study the graphic below and watch the video so that you understand where your fingers go to play each chord. You can click on the image to see an enlarged version. Practice going between the chords focusing on smooth transitions. Although not the Blues, you may want to follow the sequence (I-IV-I-V7-I). Once you can do this smoothly you can go onto the next tab.
-
Blues Chords
The Blues uses three different chords. These chords are known by the roman numerals (I-IV-V7) and are played with the left hand on the piano.
Study the graphic below and watch the video so that you understand where your fingers go to play each chord. You can click on the image to see an enlarged version. Practice going between the chords focusing on smooth transitions. Although not the Blues, you may want to follow the sequence (I-IV-I-V7-I). Once you can do this smoothly you can go onto the next tab.
-
Blues Progression
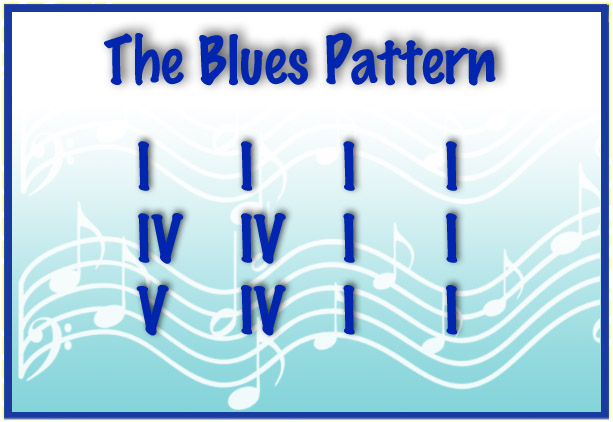
The Blues is arranged in twelve bar sequences oftentimes referred to as the “12 Bar Blues.” This sequence is played in the left hand.
Now that you understand what the I-IV-V7 chords are its time to arrange them into a 12 bar blues sequence. Study the graphic below and watch the video so that you understand when each chord should be played. Click on the graphic to see an enlarged version. Once you can play the sequence smoothly you can go onto the next tab.
-
Complete Blues
Now its time to put the left and the right hands together. Be sure to keep an even tempo in your left hand and in your right hand for now. Study the completed graphic and feel free to click on it for an enlarged version. You may also find the video useful.
After you have mastered putting the left and right hands together its time to start improvising. When you improvise on the Blues you will NOT alter how you play the chords but you will be free to play the notes of the scale in any order and at anytime you want. The rest is going to come from you and what you want to express. Now that you understand the mechanics of how to play the Blues its time to explore.